

Go live
Check your site with a test key, ask for the key to go live, and confirm that it now writes live records.
Take a working test integration to live traffic. You check the site with the test key, ask for the key to go live, and confirm the first live record. The checks take about 30 minutes. The review of your request comes on top.
Before you start#
- The banner works on your site with a test key. Set up your first banner ends there.
- The key's property has a published form.
- You can deploy a change to the production site.
Check the key's origins#
A live key answers browsers only on the origins listed on it. The list is fixed when the key is created.
- In the console, open Install and find your key in the Keys panel.
- Read the line under the key. It says where the key works.
- If a production origin is missing, choose New key and enter a Name.
- Under Allowed origins, list every production origin, one per line.
- Choose Create key, and install the new key on the site in place of the old one.
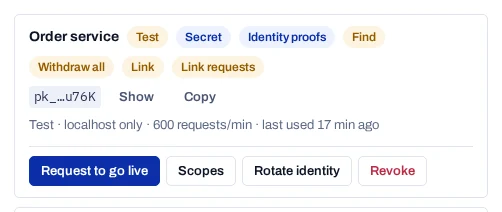
You now have a test key that lists every address your site is served from.
Test the site#
Run these checks on the site while the key is still a test key.
- Open the site in a private window, with the browser's network panel open.
- Before you answer the banner, check that no optional tag loads and no tracking cookie is set.
- Choose Reject all and check that the tags stay off.
- Run
await PiedapConsent.reset()in the browser console, then choose Accept all. Check that the tags load. - Check that every page has a way back to the preferences: the privacy button or a link marked
data-piedap-open. - In the console, open Records, choose More filters and pick Test records only.
- Check that the test records show the purposes, place and law you expect.
Then read the page source:
- The runtime tag is the first script in
<head>, withoutasyncordefer. data-piedap-country,data-piedap-subdivisionanddata-piedap-debugare removed.- No
sk_key oridv_secret appears in any page or bundle.
Remove the place override
The override works with live keys too. A page that ships with data-piedap-country shows every visitor the form for that one place.
Request to go live#
- On Install, find the key and choose Request to go live.
- Under Note for the reviewer, say where the key is installed.
- Choose Send request.
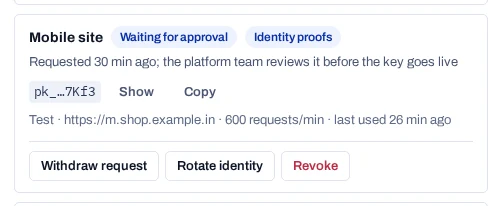
The console confirms with Request sent, and the key shows Waiting for approval. The team that runs your deployment reviews the request. Until then the key stays a test key and your site keeps working.
If the request is declined
The key shows Declined with the reviewer's reason and keeps working as a test key. Fix what the reason names, then choose Request to go live again.
Confirm the first live record#
When the request is approved, the badge changes to Live. The key string is the same, so nothing has to be reinstalled.
- On the site, run
await PiedapConsent.reset()in each browser you tested with. Those browsers still hold the id of a test record. - Answer the banner.
- In the console, open Records.
The list starts on Live records only. The new record is listed there without a Test badge. From now on the key writes live records, which are your evidence.
A live key stops working on localhost
Once a key is live it answers browsers only on its listed origins. Keep a separate test key for local development.
Next steps#
- Request to go live covers what changes once a request is approved or declined.
- Test your integration has the full checklist and ways to try other places.
- Manage keys covers scopes, rotation and revoking a key.
- Usage and limits explains the monthly record count and the rate limits on keys.
- Approve live keys is for teams that run their own deployment.