

Add Indian languages
Draft your notice in the 22 Eighth Schedule languages, approve each one, publish, and check what a visitor in India sees.
Offer your consent notice in India's 22 scheduled languages. The console drafts them, a person approves each one, and visitors in India then choose their language on the banner. Allow about 15 minutes, plus the time your reviewers need.
Before you start#
- A consent form with a region rule under the law DPDP. Set up your first banner ends with one.
- Someone who reads each language you plan to approve.
Check the translation service#
The console drafts translations with the project's translation service.
- Open Settings.
- Find Translation and keep Sarvam (default).
- If the panel says the API key is required, enter your key.
- Choose Save settings.
The console confirms with Settings saved. Sarvam covers English and the 22 Eighth Schedule languages. The wording you translate is sent to the service you choose. The service is ready when the panel says a key is saved, or that the key is optional because the deployment provides one.
Draft the languages#
- Open Consent forms and select the form.
- Choose Regions at the top of the form.
- Open the Languages tab. It says how many of the 22 languages are missing.
- Choose Translate into India’s languages.
The console drafts the form's wording and its purposes in every missing language. The form's wording is saved to the draft. The purposes are saved in the purpose registry, because every form shares them. The console then tells you to approve each language and publish.
If the panel lists all 22 languages and offers no button, the console drafted them when you added the India rule. Go on to the next part. If it shows a link to Project settings in place of the button, the translation service is not ready yet.
Review and approve each language#
A drafted translation is not a reviewed one
Have each language read by someone who knows it before you approve it. A drafted language does not reach visitors until it is approved and the form is published.
- Select the form's name at the top of the page to go back to the form.
- Open the Languages tab and open a language, such as Hindi.
- Read every field, including the purposes. Your default wording is shown beside each one.
- Correct anything that reads wrongly.
- Choose the approve button, which names the language, such as Approve Hindi.
- Repeat for each language you want to publish.
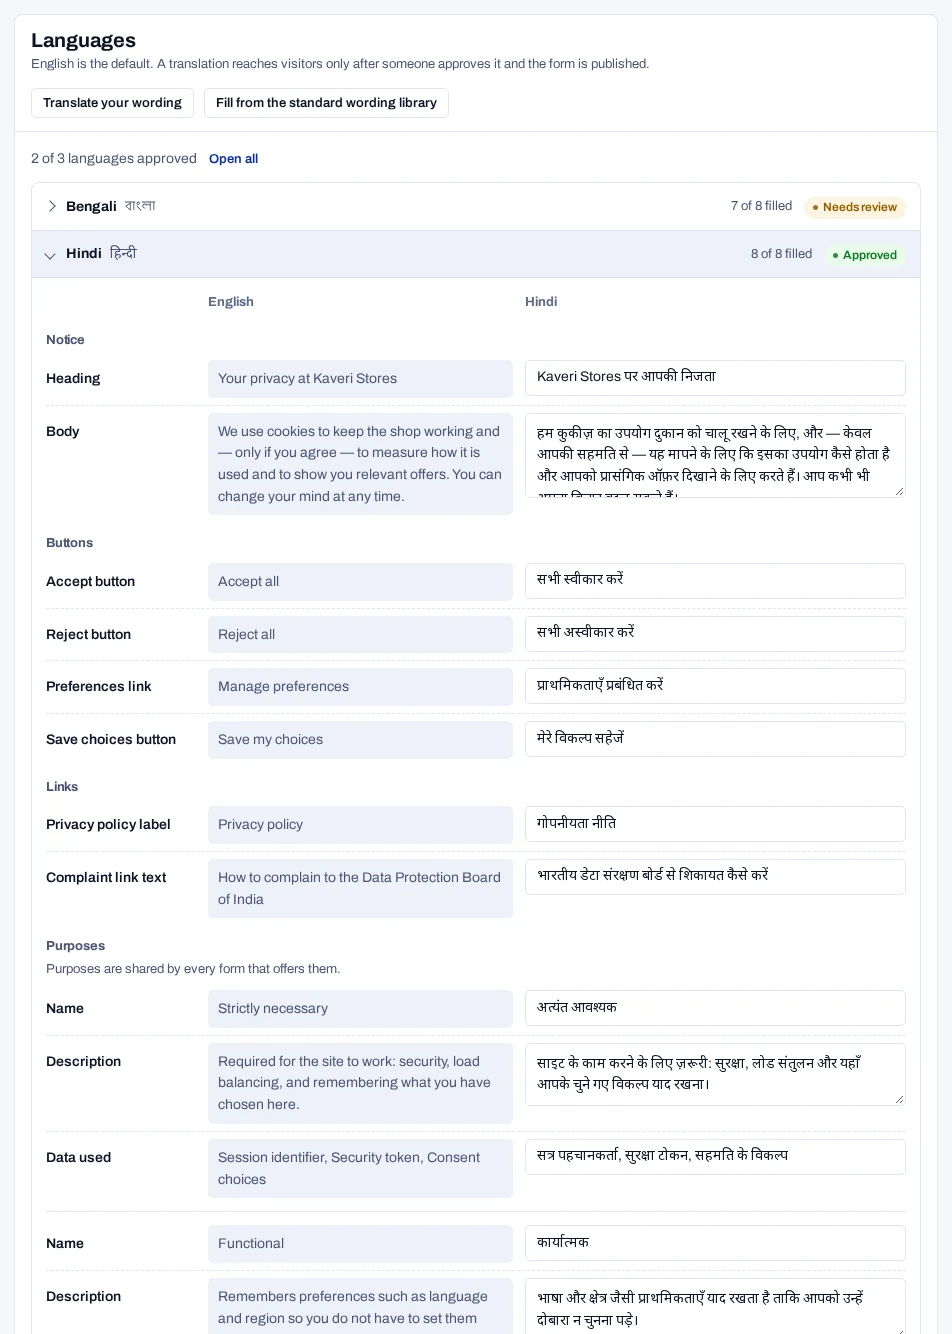
Each approved language shows Approved with the date. The line above the list counts the approved languages. A language nobody approved stays at Needs review.
Publish#
Only the default language and the approved languages go out.
- At the top of the form, choose Publish version 2. The number is the next version of your form.
- Under What changed, type a note such as
Added Indian languages. - Leave People who answered an earlier version on the recommended option.
- Read which languages the panel says are left out, if any.
- Choose Publish version 2 to confirm.
The console confirms with Published version 2. Translations are not a material change, so visitors who already answered are not asked again.
Check what visitors see#
- At the top of the form, choose Regions again.
- Find Try a visitor. Under A visitor arrives from, choose India.
- Under What they see, pick a language above the preview.
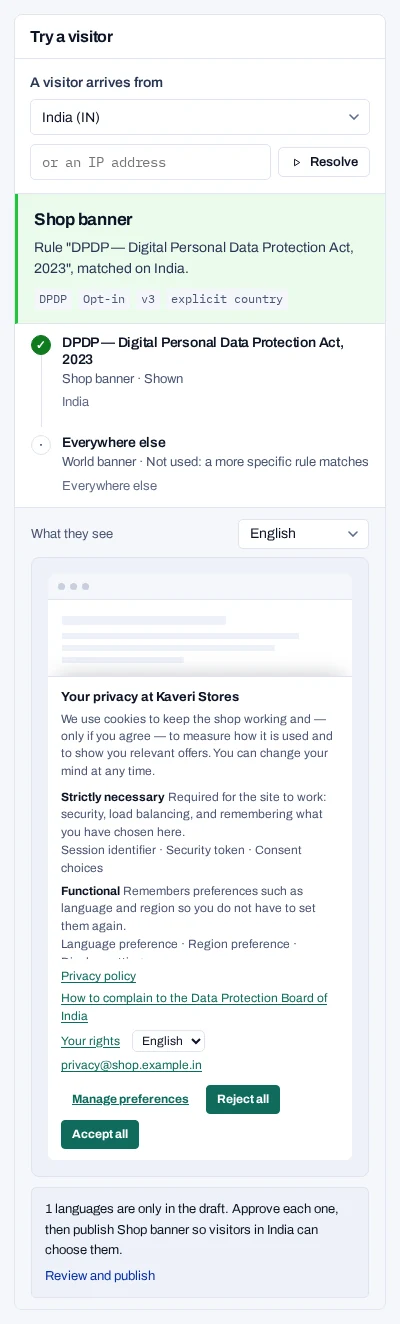
The preview draws the banner in that language. On your site, visitors in India now get a language chooser on the banner and in the preferences dialog. Each language is listed under its own name, such as हिन्दी or தமிழ்.
A visitor first sees the language of their browser, if the form is published in it. A browser set to hi-IN gets Hindi. Otherwise the visitor sees the default language.
Next steps#
- Add a language to type the wording of a language yourself.
- Translate and approve a language is the everyday how-to for one language.
- Set up the translation service for other services and keys.
- Preview as a visitor for any place and language.